Cold Porcelain is similar to most air dry clay’s and is great for
making different clay projects, especially flower sculptures, jewellery,
figurines and cake toppers. It is also great to use with moulds as it retains
fine detail and is easy to remove from the mould. It is now becoming more and
more popular with professional clay artists and craft people. It is also a great craft clay to use for beginners for their clay art projects.
This
clay is perfect for making delicate flowers and petal sculptures as it can be
stretched and rolled extremely thin, which results in very realistic looking
floral effects.
It has a similar texture to polymer clay’s when uncured but is
much softer and easier to condition and work with. It also feels like polymer clay when it is cured, as it has a hard plasticity to it, even though it is air
drying.
Cold Porcelain is called ‘cold’ because although heat is used in making the clay it doesn’t need any heat to be cured and ‘porcelain’ because once it is dry it looks very similar to slightly translucent porcelain clay.
Cold Porcelain is called ‘cold’ because although heat is used in making the clay it doesn’t need any heat to be cured and ‘porcelain’ because once it is dry it looks very similar to slightly translucent porcelain clay.

Clay Work With Cold Porcelain
Cold Porcelain can stiffen up if left for a while but can easily
be rejuvenated again. To soften cold porcelain place it in a air tight container and
place the container in a bowl of hot (not boiling) water for a few minutes and it will soften
almost immediately. If your clay is too soft place in an air tight container and
leave it in the fridge for a few minutes and it will become stiffer. Condition
the clay by kneading it in your hands until it is the right consistency and
easy to work with. If you place this type of clay directly in water it will
turn into it initial state of a paste like consistency.
Storing Clay
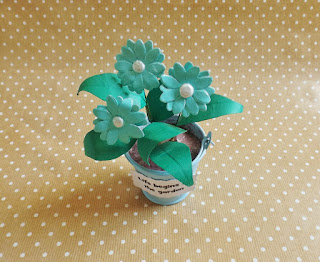 |
| Cold Porcelain Flower Sculptures By Maddiclay Designs |
Conditioning Clay
It is very important to condition your clay
well before making any creations as this will prevent the clay from cracking
during the drying process. Simply knead and work the clay in your hand to warm
it up and remove any air bubbles. The length of time to condition the clay will
vary with each clay but it is always a good idea to condition it well until it
is warm and has an elasticity to it. If your hands and clay are very dry then
coat your hands with Vaseline or moisturising lotion before kneading (Don’t use
water to moisten your hand or the clay). If your clay does show cracks when it
is dry then it can be repaired with more clay and then sanded once the repair is
dry.
Drying Clay
Cold Porcelain, like most air dry clay's, is non toxic
and will usually dry within 24 hours at room temperature. Place the creation on
a piece of absorbent paper, such as kitchen towel and allow it to dry
naturally. Don’t try to rush the drying process with heat as this will cause
the clay to crack. It dries to a light weight and strong finish and thin pieces
are also slightly flexible. Cold Porcelain does have some shrinkage once dry so
this should be taken into account when creating certain sculptures.
Colouring Clay
There are a number of different ways to colour cold porcelain, including
blending in colourants while the clay is moist or colouring it when it is completely
dry. If you intend to paint the clay once it is cured then it is recommended
that you mix white paint with the clay while it is moist, unless you want translucent
clay. It is a good idea to only colour the amount of clay needed at the time,
as stored coloured clay doesn’t last as long as clear clay and may turn mouldy
sooner.

Food colourants are great to use with cold porcelain while it
is moist and especially if you only want to tint the clay and preserve its
translucent effect when dry. This method does get messy so it’s a good idea to
do this over a sink or on a covered work surface.
This effect can also be achieved using alcohol marker pens. Dab the pen a few times on the clay and knead the clay until it achieves the right colour or add more dabs for more intense colour. Alcohol pens will only provide a tint effect.
This effect can also be achieved using alcohol marker pens. Dab the pen a few times on the clay and knead the clay until it achieves the right colour or add more dabs for more intense colour. Alcohol pens will only provide a tint effect.
Cold Porcelain is hard once cured but can
also be fragile to heat and moisture. It is therefore important to glaze the
creation with varnish so that it is sealed and will prevent moisture and
bacteria from damaging the creation. It can be glazed with most sealants such
as water based varnish, spray lacquer, dip sealers or modge podge.
********************
How to Make Homemade Clay

If you want to make cold porcelain at home then your basic ingredients are:
1 cup PVA glue
1 cup Corn flour
1 cup Corn flour
Lemon juice (or similar acidic product)
Baby oil or Vaseline
The Lemon juice and/or other
similar acidic ingredients are added to the mixture to prevent mould, bacteria
and fungi. It is then heated in a microwave or on a hob into a paste
like texture.
You will also need:
Sealable plastic bag and/or an air tight
container
Cling Film
A microwavable bowl or pan
A wooden spoon
Microwave or Oven Hob
Microwave or Oven Hob
Mix the glue and corn flour together in the mixing bowl then stir
in the oil and lemon juice. Heat the mixture in the microwave at 30 second
intervals until all the liquid as gone. Make sure you stir the mixture between
each heating. It will start by being lumpy and then will thicken into a ball
and become stiffer to stir. The number of cooking intervals will vary depending
on the wattage of the microwave. It is usually between 3 and 5 alternate 30
second intervals.
If you prefer to use
a cooker hob stir over a low heat until all the liquid has evaporated and the
mixture forms a solid ball. Make sure you continually stir the mixture while it
is on the heat. The heating process usually takes about between 5 – 10 minutes.
Once the clay has been removed from the heat
leave to stand with a cold cloth on it until it is cool enough to handle. Don’t
leave the clay too long or it will stiffen up and be harder to knead.
Place a sheet of cling film on the work
surface and coat it with baby oil or Vaseline so that the clay doesn’t stick to
the surface. It might also help if you put some of the oil or Vaseline on you
hands. Continually knead the clay until it is cold, pliable and can form peaks
and shapes.
When you are happy with the clay place it in a plastic air tight bag or container that has been coated inside with the oil or Vaseline. Place it
in the fridge and leave it for 24 hours. Then remove the amount of clay you
require and knead and condition well before making your clay creations.
 This size lump of cold porcelain was made for about £1 with the
above ingredients and as long as it is stored in an air tight container it will
make a huge number of creations.
This size lump of cold porcelain was made for about £1 with the
above ingredients and as long as it is stored in an air tight container it will
make a huge number of creations. There are loads more different homemade clay recipes and techniques available for cold porcelain so here are a few more links that you might like to try:
*Cold Porcelain Tutorials - Recipes
*Things To Make And Do - ColdPorcelain Clay
* WikiHow - How to Make Cold Porcelain
* Hub Pages
- How to make porcelain clay